Made in USA by
E-Z-FLOSS ®
P.O. Box 2292
Palm Springs, CA 92263
(800) 227-0208
Visit us on the web at:
www.ezfloss.com
Copyright 2001-2010 E-Z-Floss®
E-Z-Floss® is a Registered Trademark.
All Rights Reserved.
E-Z-FLOSS ®
P.O. Box 2292
Palm Springs, CA 92263
(800) 227-0208
Visit us on the web at:
www.ezfloss.com
Copyright 2001-2010 E-Z-Floss®
E-Z-Floss® is a Registered Trademark.
All Rights Reserved.

recommended instructions for
RELOADING YOUR E-Z-FLOSS® DENTAL FLOSS HOLDER
RELOADING YOUR E-Z-FLOSS® DENTAL FLOSS HOLDER
- Cut a piece of floss 24-72 inches (60-180 cm) long.
- Holding one end with your thumb at point A, secure it by pulling through Slot B. Then wrap all but 12 inches (30 cm) around the neck in the storage area C.
- Carry the length of floss around Button D, along the side of the
holder and through Slots E and F.
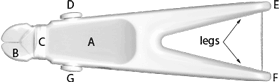
- While squeezing the “legs” together with one hand, pull the floss
taut through Slot B. While maintaining this tension, secure the
floss by carrying it around Button G and bring it back through Slot
B. Continue until all floss is secured.
IT IS IMPORTANT TO MAINTAIN THE TENSION BETWEEN SLOTS E AND F.
- Test for proper tension between Slots E and F by flicking the thumb nail across the material. The material should “snap”, not give. If it does not snap, repeat Step 4 and test again.
- When the floss breaks, remove the broken end, advance 8 inches
(20 cm) from the storage area C and repeat steps 3-5.
ROUGH SURFACES ON THE TEETH THAT CAUSE EXCESSIVE BREAKING SHOULD BE BROUGHT TO THE ATTENTION OF YOUR DENTIST.
Made in USA by
E-Z-FLOSS ®
P.O. Box 2292
Palm Springs, CA 92263
(800) 227-0208
Visit us on the web at:
www.ezfloss.com
Copyright 2001-2010 E-Z-Floss®
E-Z-Floss® is a Registered Trademark.
All Rights Reserved.
E-Z-FLOSS ®
P.O. Box 2292
Palm Springs, CA 92263
(800) 227-0208
Visit us on the web at:
www.ezfloss.com
Copyright 2001-2010 E-Z-Floss®
E-Z-Floss® is a Registered Trademark.
All Rights Reserved.
recommended instructions for
RELOADING YOUR E-Z-FLOSS® DENTAL FLOSS HOLDER
RELOADING YOUR E-Z-FLOSS® DENTAL FLOSS HOLDER
- Cut a piece of floss 24-72 inches (60-180 cm) long.
- Holding one end with your thumb at point A, secure it by pulling through Slot B. Then wrap all but 12 inches (30 cm) around the neck in the storage area C.
- Carry the length of floss around Button D, along the side of the
holder and through Slots E and F.
- While squeezing the “legs” together with one hand, pull the floss
taut through Slot B. While maintaining this tension, secure the
floss by carrying it around Button G and bring it back through Slot
B. Continue until all floss is secured.
IT IS IMPORTANT TO MAINTAIN THE TENSION BETWEEN SLOTS E AND F.
- Test for proper tension between Slots E and F by flicking the thumb nail across the material. The material should “snap”, not give. If it does not snap, repeat Step 4 and test again.
- When the floss breaks, remove the broken end, advance 8 inches
(20 cm) from the storage area C and repeat steps 3-5.
ROUGH SURFACES ON THE TEETH THAT CAUSE EXCESSIVE BREAKING SHOULD BE BROUGHT TO THE ATTENTION OF YOUR DENTIST.